Can Interi Max be used with a spotlight rail?
If you have a rail of LED spotlights it is theoretically possible to drive it with Interi. However, it is very important not to exceed the Maximum capacities of Interi (i.e. 400W / 2A at most). For this it is not enough to add the power in W of the spots and to compare. In fact, LEDs do not work like traditional bulbs, when they are switched on there is a phenomenon called "inrush". When switching on an LED bulb, the bulb consumes much more than indicated on the bulb's wattage and current specifications. Therefore, it is recommended to use Interi with a Single bulb. If you connect a spotlight rail we recommend at this stage not to exceed 5 small LEDs with a cumulative nominal power <40 Watts
How long is the consumption history of the plug stored?
The history is 1 year. The data is saved in the Cloud. After a year, the data is replaced by the new ones as they arise.
How to Install the Senso detector?
Do not hesitate to watch the tutorial video made by Amazing Mac TV
How to reset Vollo (or Vollo Max)
After changing the box or password, for example, you will have to reset Vollo and reinstall it:
Press and hold the Top button for about 15 seconds, until the light flashes rapidly.
Open the Konyks app on your smartphone to reinstall the device
PS: the top is the side where the wires arrive
How to disassemble the front plate of the Vollo Max for wall ?
Here are some tips for mounting and dismounting the front panel of the Vollo and Vollo Max Vollo Max LD Disassembly
To close all your shutters without voice assistants
To close all your shutters at the same time and without voice assistants, you can:
Create a scenario.
It could not be easier:
Enter scenario,
(clicking in the middle at the bottom)
Then in define a condition, click on "Type to execute"
Then click on "run device"
Then Choose your Vollo or Vollo MAX
Choose ► switch
Specify whether you want to ► open or ► close
Save
again add a task by clicking on the "+" which is in front of the word "Task"
Repeat the same operation with your other Switch
You will get this:
Validate everything,
The next time to open all your shutters, all you have to do is activate the scenario you have created.
☼☼☼
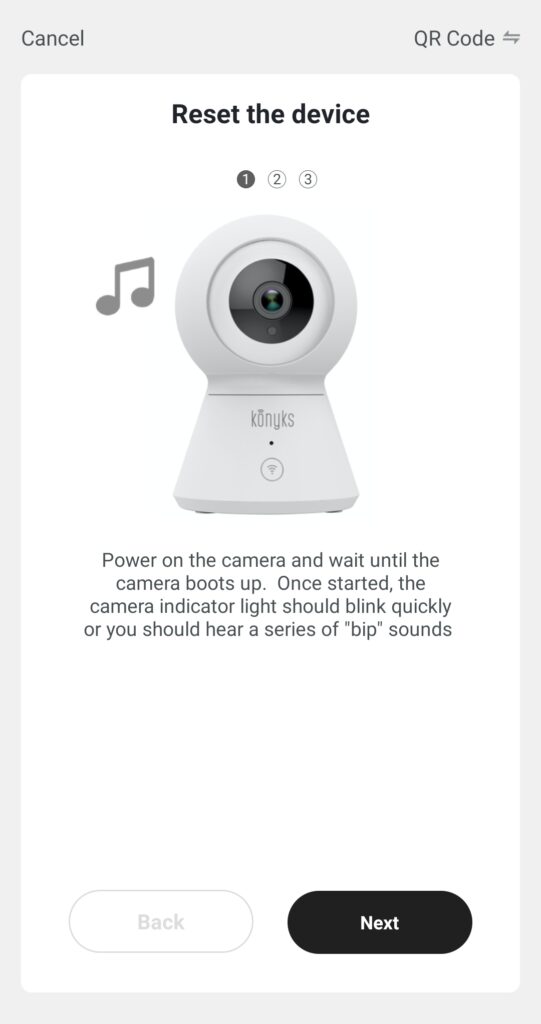
The camera cannot connect to the Konyks app?
As specified for all Konyks devices you need a 2.4Ghz wifi network
Also pay attention to the Wi-Fi security protocol, you must choose the WPA2-PSK / AES mode
(setting in the interface of your internet box or router)
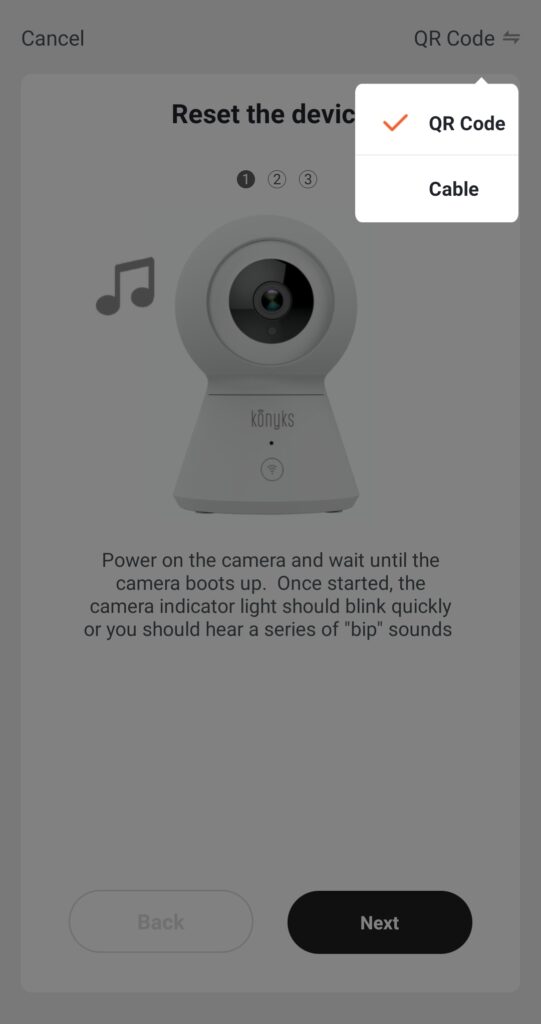
If you have difficulty connecting in EZ mode, do not hesitate to try the QR Code mode which works with great reliability. With the Livebox it is sometimes necessary to deactivate the firewall. You can reactivate it after installation. Temporarily disabling the firewall during setup would allow you to spend much less time.
Error message "Wi-FI name or password too long" when connecting the Camini +
It seems that this is linked to pairing (connection) in QR CODE.
So you can,
In addition to this, you need to know more about it.
1- either switch to EZ Mode, i.e. simple mode via wifi. (The Qr code makes it easier to focus on identifying the device to be connected)
To do this, direct you to the Konyks app:
-you click on "+"
- then on "camera"
- and at the top right you can click on "net pairing mode" a small window will open,
you will choose "ez mode"
2- or modify your wifi code from the configuration platform of your box.
3-Be aware that in QR Code mode it is possible that, despite the warning message, you can force the passage and connect in QR code with a code of more than 20 characters, the only downside is that this will not not work every time and we can guarantee an immediate connection in this case.
What you should know before installing your Konyks Interi connected switch
Installation
First of all, know that if you want to equip yourself with a connected switch, your installation must be equipped with these wires:
1 / The Live phase (red or brown, with "L" for "Live"),
2 / The neutral (blue, with "N" for "Neutral")
A neutral wire is therefore essential for installing a switch
Which bulb to choose?
The Konyks Interi switch allows you to vary the light intensity of the LED bulbs to which it is linked.
So it is necessary to associate a dimmable bulb.
If a bulb is dimmable, it means that it is compatible with an LED dimmer also called an LED dimmer.
On the other hand, it is not necessary or even not recommended to associate a connected bulb.
How to control my connected devices from Jeedom without using IFTTT?
You may know, since May 2020 IFTTT has made its service paid and no longer allows connection with Tuya type devices, including Konyks. For users with somewhat complex installations, the association of Jeedom and IFTTT allowed great flexibility in automation, but the end of IFTTT means that many Jeedom users must find alternatives to control their Konyks devices. This was without counting the contribution of one of our users, Aurélien Brunet, who wrote a great article with a detailed tutorial to allow Konyks users to do without IFTTT and continue to control their devices from Jeedom.
How do I link Konyks devices to Google Home?
In order for you to be able to use our Konyks products with a Google Home, please create your Google home account and follow these steps
To connect your Konyks device to Google Home
- Open the Google Home app
- Click on the + icon (top left)
- choose "configure a device"
- Choose "works with Google / You have already configured devices"
- In the list look for and select Konyks
- Enter the credentials used when you created your account in the Konyks app
- press OK and wait 10 seconds
- Check in the list of devices if your Konyks device is present
If the device does not appear you can say "OK Google, synchronize the devices" Then your Konyks devices will be controllable with your voice and also from the Google Home application (be careful, some functions are not managed by the Google Home APP and will only be available from the Konyks app)
How to launch a scenario from Google Home?
Scenario creation allows you to chain several commands to your Konyks devices
The scenario can be started manually but it can also be executed with a voice command
With Google Home here is how to proceed
- Make sure you have connected Konyks and Google Home (see previous FAQ)
- Create your scenario in the Konyks app
- Say OK Google synchronizes the devices to make sure your scenario is synchronized with Google Home
- Say OK Google runs "scenario name"
You can also try the OK Google active command "scenario name"
If Google Home does not understand you or does not execute the scenario correctly, the name of the scenario is probably confusing with other commands understood by Google Home, try giving your scenario a different name.